Overview: This article discusses the process of adding a camera to the Foscam app in just a few steps.
1.Verify the camera supports the Ezlink feature and power it on.
a.If the camera UID ends with YZZ/ZZZ it supports Ezlink. The UID number is below the QR code on the camera’s sticker.
2.Make sure the camera is in the Ezlink mode.
a.Reset camera to default to put it in Ezlink mode, see here on how to reset the camera.
3.Maintain a distance between the camera and router between 2-5 meters. (6-15 feet)
4.Verify the smart device/phone is connected to the 2.4 GHz WIFI band on the wireless network. 5 GHz bands are currently not supported by our products.
Verify that there are no specialty characters present in the wireless network password. If so the password for the wireless network will need to be updated. Specialty characters include !@#$% etc.
Step 1: Launch the Foscam app and login to the Foscam Cloud account.
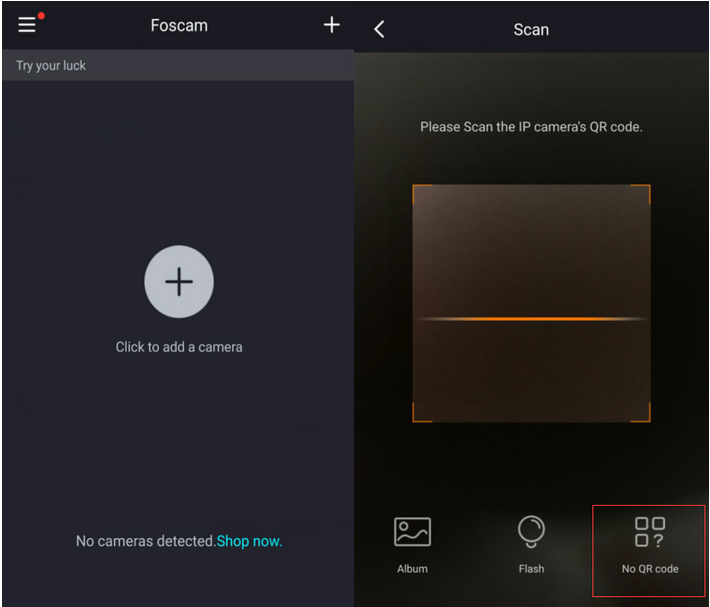
Click the + button to add a new camera to scan the QR code located on the bottom or back of the camera.

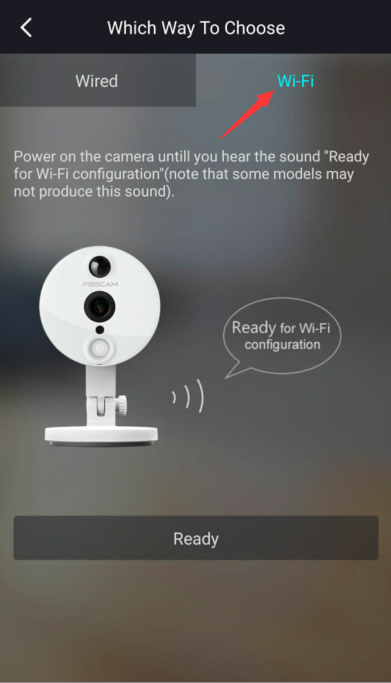
Step 2: Then please choose “Wi-Fi”, then tap on “Ready”.

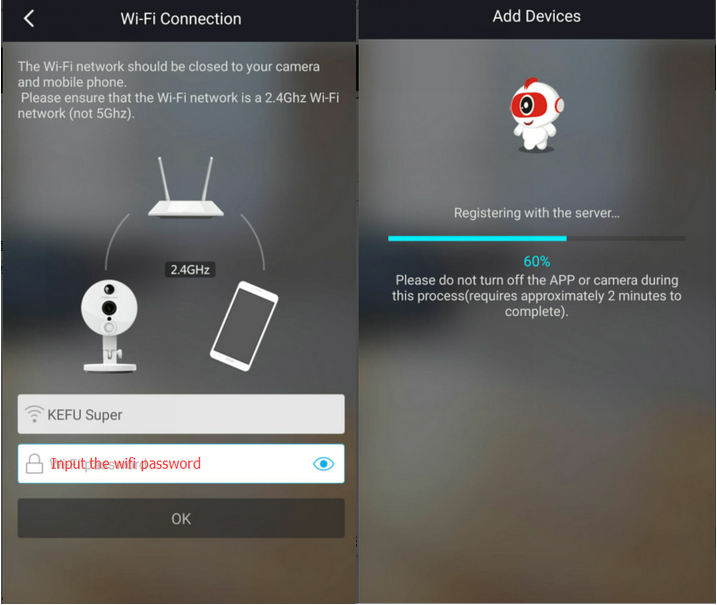
Step 3: Input the Wi-Fi network password and click “OK”
Standby for up to two minutes while the smart device communications across the wireless network to configure the camera to log onto the LAN.

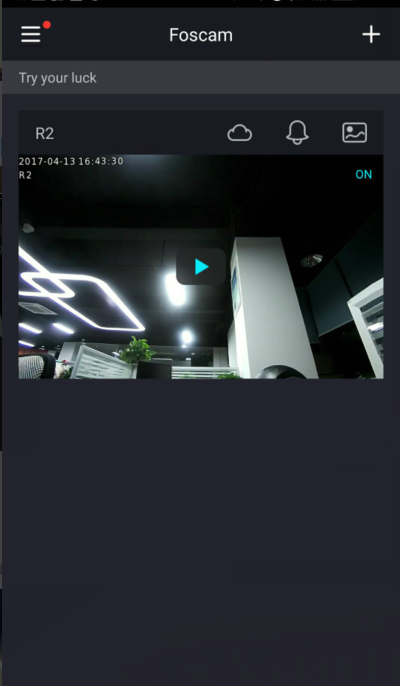
Step 4: After the camera is added to the network click on the play button to view video feed from the camera.
The app will ask you to create a new username and password for the camera if the unit has not been configured yet or has been reset to factory settings.

Note: The maximum username is 20 characters in length including letters, numbers and symbols _-@$*
The length of the password should be 6-12 letters, numbers and combinations of symbols. Symbols supported are ~ ! @ # % * ( ) _ = { } “ | < > ? ` - ; ’ \ , . /
Technical Note: Not all wireless routers support this feature. If you experience difficulties connecting the camera via this method the alternative is to connect the camera via an ethernet cable. Follow this link to connect the camera via an Ethernet cable. https://www.foscam.com/faqs/view.html?id=19
Preparation:1.Verify the camera supports the Ezlink feature and power it on.
a.If the camera UID ends with YZZ/ZZZ it supports Ezlink. The UID number is below the QR code on the camera’s sticker.
2.Make sure the camera is in the Ezlink mode.
a.Reset camera to default to put it in Ezlink mode, see here on how to reset the camera.
3.Maintain a distance between the camera and router between 2-5 meters. (6-15 feet)
4.Verify the smart device/phone is connected to the 2.4 GHz WIFI band on the wireless network. 5 GHz bands are currently not supported by our products.
Verify that there are no specialty characters present in the wireless network password. If so the password for the wireless network will need to be updated. Specialty characters include !@#$% etc.
Step 1: Launch the Foscam app and login to the Foscam Cloud account.
Click the + button to add a new camera to scan the QR code located on the bottom or back of the camera.

Step 2: Then please choose “Wi-Fi”, then tap on “Ready”.

Step 3: Input the Wi-Fi network password and click “OK”
Standby for up to two minutes while the smart device communications across the wireless network to configure the camera to log onto the LAN.

Step 4: After the camera is added to the network click on the play button to view video feed from the camera.
The app will ask you to create a new username and password for the camera if the unit has not been configured yet or has been reset to factory settings.

Note: The maximum username is 20 characters in length including letters, numbers and symbols _-@$*
The length of the password should be 6-12 letters, numbers and combinations of symbols. Symbols supported are ~ ! @ # % * ( ) _ = { } “ | < > ? ` - ; ’ \ , . /
